The SEO Site Launch Checklist
During a new website launch, aspects of technical SEO are easily overlooked – until it’s too late. The best way to avoid indexing errors, messy links, broken event tracking and other SEO problems is to create a well-defined website process with clear division of responsibility. That’s why our agency made this website-launch SEO checklist.
The checklist was created for SEOs who are overseeing a website’s technical health and analytics setup before and after launch. However, developers should be on standby to help fix any sweeping issues programmatically and ensure the site is ready to rock.
Read through the full version right here, which includes rationale for certain steps. Items are in recommended order of completion.
Then get the compact, printable (and space-themed!) PDF version by completing this form.
Remember – this checklist does not include non-technical SEO and content strategy tips. Create a separate plan for optimizing your content! If you need help from experts, consider Oneupweb’s SEO services. We can build a plan together.

New Website Launch: SEO Health Must-Dos
Pre-Launch SEO Checklist
Follow these steps after the website is fully staged, URLs are final and design/development QA is nearing completion.
In the CMS:
- Make sure the Google Analytics (GA) tracking script has been applied to all pages. Skip this step if you use Google Tag Manager – you’ll set up GA tracking through Google Tag Manager instead.
- If you use Google Tag Manager (GTM), make sure the correct GTM container script is added to all pages on the site – either on the backend or through the CMS settings.
- After the GA and GTM tracking scripts are in place, use the Google Tag Assistant browser plug-in to confirm correct implementation.
- Check CMS settings to ensure a “Discourage search engines from indexing this site” checkbox is not checked. (In WordPress, this lives under Settings > Reading option.)
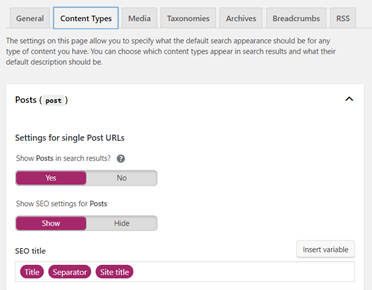
- Check search appearance settings (e.g., through Yoast in WordPress). If you want to exclude various Content Types, Taxonomies/Tags, and other URLs from search engine results, do so here.

In Screaming Frog or a similar crawl tool:
- Crawl the staging site, and check that all URLs are accessible to the crawler.
- Using the crawl data, ensure important elements are in place: title tags, H1s, meta descriptions, hreflang tags, canonical and NOFOLLOW meta tags, etc.
- Check the title tags to make sure custom titles are intact and default settings are correct. For example, you may want to adjust the separator symbol (- or |) or default website name in the CMS settings.
- Address any 404 errors with 301 redirects or other appropriate solution.
In spreadsheets:
- Map 301 redirects, using a crawl of the current (old) site and a crawl of the staged (new) site.
- Map the redirects in a simple “redirect column A to column B” format so you can easily implement them in bulk through your hosting platform, a CMS plugin or your .htaccess file.
- We recommend making the .htaccess method a last resort – and making sure someone familiar with this environment is performing the task!
- Use regex wherever possible to limit the total number of required redirects.
- Don’t forget to account for all existing 301s and 404s during your 301-mapping process. This will help you avoid redirect chains and loops.
- Map the redirects in a simple “redirect column A to column B” format so you can easily implement them in bulk through your hosting platform, a CMS plugin or your .htaccess file.
On the staged site:
- Confirm proper implementation of schema markup, where applicable, using a tool such as Google’s Structured Data Testing Tool.
- Confirm H1s are the first text on each page template. No other header style should appear above the H1.
- Confirm proper pagination of post archives, such as your blog or news indexes. This will prevent inconsistent indexing of your posts and is especially important for websites with hundreds or thousands of posts.
In Google Tag Manager (GTM) or similar event tracking solution:
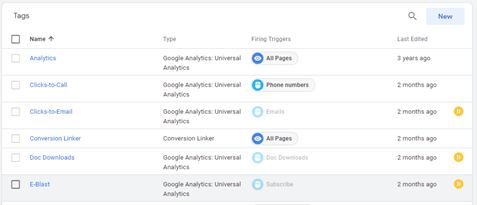
- Set up all tags and triggers needed for the new site.
- Set up the Universal Analytics variable, tag, and trigger for pageview tracking (if not already in place).
- After testing, keep any new tags paused so they don’t interfere with current tracking before you launch.
- If you already have some tracking and will be staying on the same domain, use GTM preview mode and Google Tag Assistant on the staging site to confirm everything still works.

Extra steps for ecommerce websites:
- Integrate your ecommerce solution with Google Analytics by adding the proper tracking code (UA code) to the settings.
- If your CMS is not built specifically for ecommerce but has an ecommerce plugin, this GA-integration step is typically done through another plugin – like WordPress’s “Enhanced Ecommerce Google Analytics Plugin for WooCommerce.”
- In Google Analytics, turn on “Enable Ecommerce” and “Enhanced Ecommerce” in the Admin settings.
- Perform a test purchase on the staged site. 24 hours later, check Google Analytics Events and Ecommerce data for purchase-related events and conversions.
Post-Website-Launch SEO Checklist
Yes! Your website is officially live! Now double-check that everything is poised to perform well in search engines.
In Google Tag Manager (GTM) and Google Analytics (GA):
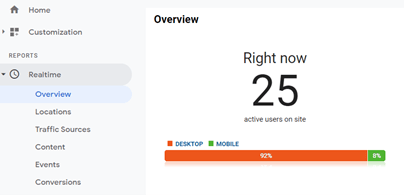
- Make sure sessions and pageviews are tracking in GA Realtime data (triggered by your Universal Analytics tag in GTM).
- Be sure you are looking at an unfiltered View so your own activity is shown in Realtime data.
- Un-pause any new tags you created in GTM, and test them yet again using GTM preview mode, Google Tag Assistant, and GA Realtime data.
- In GTM, pause or delete tags that were used for your site previously but are no longer needed.
Add or re-configure Goals in GA, as desired, to correspond with any new or adjusted tags in GTM.

On the website:
- Optimize the robots.txt file. (Go to yourdomain.com/robots.txt)
- Remove any unnecessary Disallows. This ensures all important areas of your site will be indexed.
- Add a Disallow for internal login pages (like /wp-admin/) and other pages or folders that shouldn’t be indexed.
- Add a sitemap line at the end of the robots.txt file. (Sitemap: https://www.yourdomain.com/sitemap.xml)
- Confirm implementation of 301s by spot-checking URLs. (Or implement the redirects now, if not complete.)
- Check page speed on the homepage, and spot-check speed on at least one page per template – one service page, one product page, one blog, one archive page, etc. Lighthouse is a good tool to start with, and it’s a good idea to combine it with others, such as Chrome User Experience Report (CrUX).
- If areas of your site are loading slowly, work with your development team to resolve issues. For example, optimize images, minify JavaScript, upgrade hosting and consider plugins for improving performance.
- If each page is highly customized rather than template-based, this will be a longer process.
In Screaming Frog or a similar crawl tool:
- Crawl all URLs on the live site, crawling the XML sitemap simultaneously. (If you’re using Screaming Frog, just check the “crawl linked sitemaps” box under Configuration > Spider.)
- Export the crawl data to a spreadsheet, and compare it to the pre-launch (old site) crawl to ensure all files, title tags and other important data are still there.
- Look for any new errors (e.g., 404, 403) and inappropriate NOINDEX or NOFOLLOW meta tags.
- Audit and optimize the XML sitemap, ensuring all pages are present and have proper inlinks (i.e., users and search engines can find them). If you’re using Screaming Frog, try the Crawl Analysis tool for your sitemap audit. Other SEO software providers, like SEMrush, offer similar tools.
In Google Search Console and Bing Webmaster Tools:
- Verify your website in Google Search Console and Bing Webmaster tools. This will ensure that each search engine keeps close tabs on your evolving website and notifies you of indexing errors. It also gives you access to some excellent performance-troubleshooting tools.
- Submit your XML sitemap to both.
- After data populates in Google Search Console, resolve any errors being flagged under Coverage or the Enhancements tools (Mobile Usability, Core Web Vitals, AMP, etc.). Core Web Vitals are especially important after Google’s 2021 Page Experience algorithm update.
Need a Hand with Launching?
The above SEO site launch checklist contains actual steps that Oneupweb’s SEO team takes when assisting with a website design and development project. Our developers have their own pre- and post-launch checklists with more than 50 steps! All this occurs after a thorough QA process.
It’s a lot to handle, right? We’d be happy to help you make sense of the process by consulting or becoming your full-service agency partner. Our in-house designers, developers, SEOs and marketing experts are a powerful support system. Just contact us here or call (231) 922-9977.